You can auto scale Palo Alto Firewall in AWS Cloud.
Recently I came across an issue that I observed during Palo Alto firewall Auto Scaling in Asia Pacific Region.
Requirements were :
———————————
— Use CloudFormation in AWS – Create Stack
— VPC template to use : classic – version 1.2
— Bootstrap the PA-VM to integrate with Panorama.
— Use NAT Gateway rather than assigning EIP to each virtual Palo Alto Firewall.
— Region : Asia Pacific South 1.
NOTE : This article is not a step by step Autoscaling tutorial.
- Lambda Function is available for Asia Pacific Region (Esp. Mumbai).
- I found some issues with the auto-scaling GitHub Repository – version 1.2 (https://github.com/PaloAltoNetworks/aws-elb-autoscaling) provided by Palo Alto for Asia Pacific Region.
- If you are using Cloud Formation stack to achieve the task you might come across an error that says :
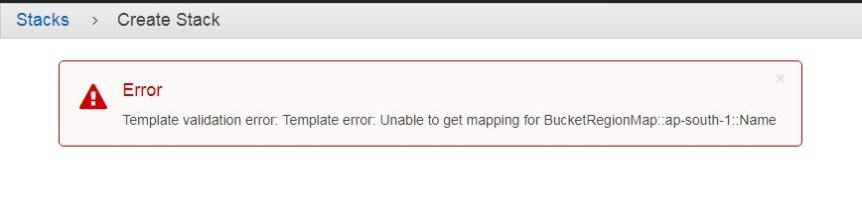
This is because the template that has been downloaded from GitHub is missing Region – AMI ID mapping.
- Here is what you need to do, for any auto-scaling in AP Region, you need to make modifications in the template “vpc-classic-v1.2.template” (AWSRegionArch2AMI and BucketRegionMap).
- Exact changes to be made are mentioned below :
Template from GitHub Repository :
———————————————————-“AWSRegionArch2AMI” : {“us-east-1” : {“PV64” : “ami-1ccae774”, “HVM64” : “ami-1ecae776”, “HVMG2” : “ami-8c6b40e4”},“us-east-2” : {“PV64” : “NOT_SUPPORTED”, “HVM64” : “ami-c55673a0”, “HVMG2” : “NOT_SUPPORTED”},“us-west-2” : {“PV64” : “ami-ff527ecf”, “HVM64” : “ami-e7527ed7”, “HVMG2” : “ami-abbe919b”},“us-west-1” : {“PV64” : “ami-d514f291”, “HVM64” : “ami-d114f295”, “HVMG2” : “ami-f31ffeb7”},“eu-west-1” : {“PV64” : “ami-bf0897c8”, “HVM64” : “ami-a10897d6”, “HVMG2” : “ami-d5bc24a2”},“eu-central-1” : {“PV64” : “ami-ac221fb1”, “HVM64” : “ami-a8221fb5”, “HVMG2” : “ami-7cd2ef61”},“ap-northeast-1” : {“PV64” : “ami-27f90e27”, “HVM64” : “ami-cbf90ecb”, “HVMG2” : “ami-6318e863”},“ap-southeast-1” : {“PV64” : “ami-acd9e8fe”, “HVM64” : “ami-68d8e93a”, “HVMG2” : “ami-3807376a”},“ap-southeast-2” : {“PV64” : “ami-ff9cecc5”, “HVM64” : “ami-fd9cecc7”, “HVMG2” : “ami-89790ab3”},“sa-east-1” : {“PV64” : “ami-bb2890a6”, “HVM64” : “ami-b52890a8”, “HVMG2” : “NOT_SUPPORTED”},“cn-north-1” : {“PV64” : “ami-fa39abc3”, “HVM64” : “ami-f239abcb”, “HVMG2” : “NOT_SUPPORTED”}},“BucketRegionMap” : {“us-west-2” : { “Name”: “panw-aws-us-west-2” },“us-west-1” : { “Name”: “panw-aws-us-west-1” },“us-east-1” : { “Name”: “panw-aws-us-east-1” },“us-east-2” : { “Name”: “panw-aws-us-east-2” },“eu-west-1” : { “Name”: “panw-aws-eu-west-1” },“eu-central-1” : { “Name”: “panw-aws-eu-central-1” },“ap-northeast-1” : { “Name”: “panw-aws-ap-northeast-1” },“ap-northeast-2” : { “Name”: “panw-aws-ap-northeast-2” },“ap-southeast-1” : { “Name”: “panw-aws-ap-southeast-1” },“ap-southeast-2” : { “Name”: “panw-aws-ap-southeast-2” },“sa-east-1” : { “Name”: “panw-aws-sa-east-1” }},
The changes I had to make to get Autoscaling working in Asia Pacific Region is :
—————————————————————————————————————————“AWSRegionArch2AMI” : {“us-east-1” : {“PV64” : “ami-1ccae774”, “HVM64” : “ami-1ecae776”, “HVMG2” : “ami-8c6b40e4”},“us-east-2” : {“PV64” : “NOT_SUPPORTED”, “HVM64” : “ami-c55673a0”, “HVMG2” : “NOT_SUPPORTED”},“us-west-2” : {“PV64” : “ami-ff527ecf”, “HVM64” : “ami-e7527ed7”, “HVMG2” : “ami-abbe919b”},“us-west-1” : {“PV64” : “ami-d514f291”, “HVM64” : “ami-d114f295”, “HVMG2” : “ami-f31ffeb7”},“eu-west-1” : {“PV64” : “ami-bf0897c8”, “HVM64” : “ami-a10897d6”, “HVMG2” : “ami-d5bc24a2”},“eu-central-1” : {“PV64” : “ami-ac221fb1”, “HVM64” : “ami-a8221fb5”, “HVMG2” : “ami-7cd2ef61”},“ap-northeast-1” : {“PV64” : “ami-27f90e27”, “HVM64” : “ami-cbf90ecb”, “HVMG2” : “ami-6318e863”},“ap-southeast-1” : {“PV64” : “ami-acd9e8fe”, “HVM64” : “ami-68d8e93a”, “HVMG2” : “ami-3807376a”},“ap-southeast-2” : {“PV64” : “ami-ff9cecc5”, “HVM64” : “ami-fd9cecc7”, “HVMG2” : “ami-89790ab3”},“ap-south-1” : {“PV64” : “ami-d4fe86bb”, “HVM64” : “ami-2dfc8442”, “HVMG2” : “ami-a5fe86ca”}, ———————->Modification“sa-east-1” : {“PV64” : “ami-bb2890a6”, “HVM64” : “ami-b52890a8”, “HVMG2” : “NOT_SUPPORTED”},“cn-north-1” : {“PV64” : “ami-fa39abc3”, “HVM64” : “ami-f239abcb”, “HVMG2” : “NOT_SUPPORTED”}},“BucketRegionMap” : {“us-west-2” : { “Name”: “panw-aws-us-west-2” },“us-west-1” : { “Name”: “panw-aws-us-west-1” },“us-east-1” : { “Name”: “panw-aws-us-east-1” },“us-east-2” : { “Name”: “panw-aws-us-east-2” },“eu-west-1” : { “Name”: “panw-aws-eu-west-1” },“eu-central-1” : { “Name”: “panw-aws-eu-central-1” },“ap-northeast-1” : { “Name”: “panw-aws-ap-northeast-1” },“ap-northeast-2” : { “Name”: “panw-aws-ap-northeast-2” },“ap-southeast-1” : { “Name”: “panw-aws-ap-southeast-1” },“ap-southeast-2” : { “Name”: “panw-aws-ap-southeast-2” },“sa-east-1” : { “Name”: “panw-aws-sa-east-1” },“ap-south-1” : { “Name”: “panw-aws-ap-south-1” } –>Modification}, - Also make sure that the firewall template has the BucketRegionMapping.
NOTE : Make sure that the AMI Id that you use in the mapping will depend upon the kind of license (BYOL or PAYG), PAN OS version and the Region where it is to be used. - Another important update is regarding bootstrapping the virtual firewall in AWS cloud : Inorder to get the licensing automated, do not follow the procedure of creating “License.txt” file (as mentioned in Admin Guide) the S3 bucket used for bootstrapping. Instead upload a plane file named “authcodes” in the S3 bucket under License Folder.
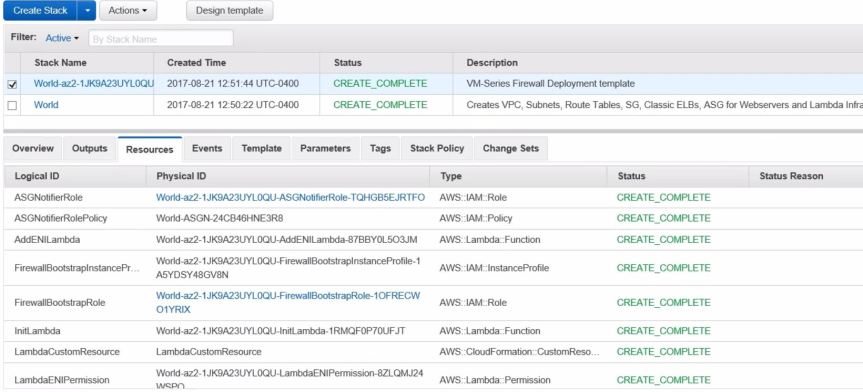
- After the Cloud Formation stack creation is successful, this is how it looks: