Autoscale Palo Alto Networks Firewall in AWS Cloud

You can auto scale Palo Alto Firewall in AWS Cloud.

Recently I came across an issue that I observed during Palo Alto firewall Auto Scaling in Asia Pacific Region.

Requirements were :
———————————
— Use CloudFormation in AWS – Create Stack
— VPC template to use : classic – version 1.2
— Bootstrap the PA-VM to integrate with Panorama.
— Use NAT Gateway rather than assigning EIP to each virtual Palo Alto Firewall.
— Region : Asia Pacific South 1.

NOTE : This article is not a step by step Autoscaling tutorial.

  1. Lambda Function is available for Asia Pacific Region (Esp. Mumbai).
  2. I found some issues with the auto-scaling GitHub Repository – version 1.2  (https://github.com/PaloAltoNetworks/aws-elb-autoscaling) provided by Palo Alto for Asia Pacific Region.
  3. If you are using Cloud Formation stack to achieve the task you might come across an error that says :
    Error_1

    This is because the template that has been downloaded from GitHub is missing Region – AMI ID mapping.

  4. Here is what you need to do, for any auto-scaling in AP Region, you need to make modifications in the template “vpc-classic-v1.2.template” (AWSRegionArch2AMI and BucketRegionMap).
  5. Exact changes to be made are mentioned below :

    Template from GitHub Repository :
    ———————————————————-

    “AWSRegionArch2AMI” : {
          “us-east-1”        : {“PV64” : “ami-1ccae774”, “HVM64” : “ami-1ecae776”, “HVMG2” : “ami-8c6b40e4”},
          “us-east-2”        : {“PV64” : “NOT_SUPPORTED”, “HVM64” : “ami-c55673a0”, “HVMG2” : “NOT_SUPPORTED”},
          “us-west-2”        : {“PV64” : “ami-ff527ecf”, “HVM64” : “ami-e7527ed7”, “HVMG2” : “ami-abbe919b”},
          “us-west-1”        : {“PV64” : “ami-d514f291”, “HVM64” : “ami-d114f295”, “HVMG2” : “ami-f31ffeb7”},
          “eu-west-1”        : {“PV64” : “ami-bf0897c8”, “HVM64” : “ami-a10897d6”, “HVMG2” : “ami-d5bc24a2”},
          “eu-central-1”     : {“PV64” : “ami-ac221fb1”, “HVM64” : “ami-a8221fb5”, “HVMG2” : “ami-7cd2ef61”},
          “ap-northeast-1”   : {“PV64” : “ami-27f90e27”, “HVM64” : “ami-cbf90ecb”, “HVMG2” : “ami-6318e863”},
          “ap-southeast-1”   : {“PV64” : “ami-acd9e8fe”, “HVM64” : “ami-68d8e93a”, “HVMG2” : “ami-3807376a”},
          “ap-southeast-2”   : {“PV64” : “ami-ff9cecc5”, “HVM64” : “ami-fd9cecc7”, “HVMG2” : “ami-89790ab3”},
          “sa-east-1”        : {“PV64” : “ami-bb2890a6”, “HVM64” : “ami-b52890a8”, “HVMG2” : “NOT_SUPPORTED”},
          “cn-north-1”       : {“PV64” : “ami-fa39abc3”, “HVM64” : “ami-f239abcb”, “HVMG2” : “NOT_SUPPORTED”}
        },

        “BucketRegionMap” : {
          “us-west-2”     : { “Name”: “panw-aws-us-west-2” },
          “us-west-1”     : { “Name”: “panw-aws-us-west-1” },
          “us-east-1”     : { “Name”: “panw-aws-us-east-1” },
          “us-east-2”     : { “Name”: “panw-aws-us-east-2” },
          “eu-west-1”     : { “Name”: “panw-aws-eu-west-1” },
          “eu-central-1”     : { “Name”: “panw-aws-eu-central-1” },
          “ap-northeast-1”     : { “Name”: “panw-aws-ap-northeast-1” },
          “ap-northeast-2”     : { “Name”: “panw-aws-ap-northeast-2” },
          “ap-southeast-1”     : { “Name”: “panw-aws-ap-southeast-1” },
          “ap-southeast-2”     : { “Name”: “panw-aws-ap-southeast-2” },
          “sa-east-1”     : { “Name”: “panw-aws-sa-east-1” }

    },

    The changes I had to make to get Autoscaling working in Asia Pacific Region is :
    —————————————————————————————————————————

        “AWSRegionArch2AMI” : {
          “us-east-1”        : {“PV64” : “ami-1ccae774”, “HVM64” : “ami-1ecae776”, “HVMG2” : “ami-8c6b40e4”},
          “us-east-2”        : {“PV64” : “NOT_SUPPORTED”, “HVM64” : “ami-c55673a0”, “HVMG2” : “NOT_SUPPORTED”},
          “us-west-2”        : {“PV64” : “ami-ff527ecf”, “HVM64” : “ami-e7527ed7”, “HVMG2” : “ami-abbe919b”},
          “us-west-1”        : {“PV64” : “ami-d514f291”, “HVM64” : “ami-d114f295”, “HVMG2” : “ami-f31ffeb7”},
          “eu-west-1”        : {“PV64” : “ami-bf0897c8”, “HVM64” : “ami-a10897d6”, “HVMG2” : “ami-d5bc24a2”},
          “eu-central-1”     : {“PV64” : “ami-ac221fb1”, “HVM64” : “ami-a8221fb5”, “HVMG2” : “ami-7cd2ef61”},
          “ap-northeast-1”   : {“PV64” : “ami-27f90e27”, “HVM64” : “ami-cbf90ecb”, “HVMG2” : “ami-6318e863”},
          “ap-southeast-1”   : {“PV64” : “ami-acd9e8fe”, “HVM64” : “ami-68d8e93a”, “HVMG2” : “ami-3807376a”},
          “ap-southeast-2”   : {“PV64” : “ami-ff9cecc5”, “HVM64” : “ami-fd9cecc7”, “HVMG2” : “ami-89790ab3”},
          “ap-south-1”   : {“PV64” : “ami-d4fe86bb”, “HVM64” : “ami-2dfc8442”, “HVMG2” : “ami-a5fe86ca”}, ———————->Modification
          “sa-east-1”        : {“PV64” : “ami-bb2890a6”, “HVM64” : “ami-b52890a8”, “HVMG2” : “NOT_SUPPORTED”},
          “cn-north-1”       : {“PV64” : “ami-fa39abc3”, “HVM64” : “ami-f239abcb”, “HVMG2” : “NOT_SUPPORTED”}
        },

        “BucketRegionMap” : {
          “us-west-2”     : { “Name”: “panw-aws-us-west-2” },
          “us-west-1”     : { “Name”: “panw-aws-us-west-1” },
          “us-east-1”     : { “Name”: “panw-aws-us-east-1” },
          “us-east-2”     : { “Name”: “panw-aws-us-east-2” },
          “eu-west-1”     : { “Name”: “panw-aws-eu-west-1” },
          “eu-central-1”     : { “Name”: “panw-aws-eu-central-1” },
          “ap-northeast-1”     : { “Name”: “panw-aws-ap-northeast-1” },
          “ap-northeast-2”     : { “Name”: “panw-aws-ap-northeast-2” },
          “ap-southeast-1”     : { “Name”: “panw-aws-ap-southeast-1” },
          “ap-southeast-2”     : { “Name”: “panw-aws-ap-southeast-2” },
          “sa-east-1”     : { “Name”: “panw-aws-sa-east-1” },
          “ap-south-1”     : { “Name”: “panw-aws-ap-south-1” } –>Modification
        },

  6. Also make sure that the firewall template has the BucketRegionMapping.

    NOTE : Make sure that the AMI Id that you use in the mapping will depend upon the kind of license (BYOL or PAYG), PAN OS version and the Region where it is to be used. 
  7. Another important update is regarding bootstrapping the virtual firewall in AWS cloud : Inorder to get the licensing automated, do not follow the procedure of creating “License.txt” file (as mentioned in Admin Guide) the S3 bucket used for bootstrapping. Instead upload a plane file named “authcodes” in the S3 bucket under License Folder.
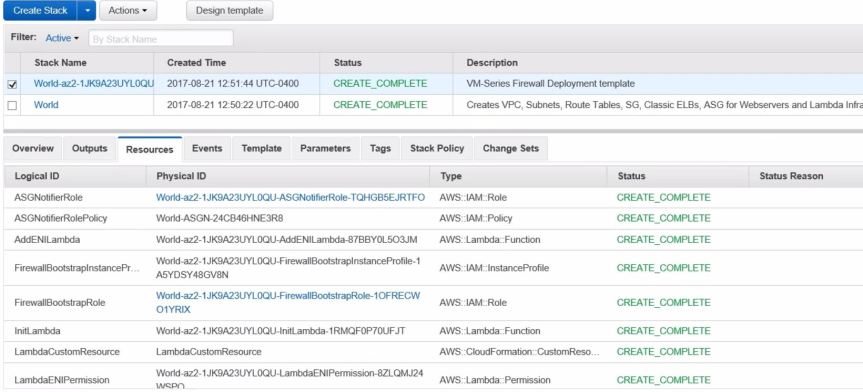
  8. After the Cloud Formation stack creation is successful, this is how it looks:
    Cx Stack Complete

Setup KVM on VMWare Workstation

This is something very basic but thought of sharing with beginners.

Here is something that I have tested and works absolutely fine.

  1. KVM is an opensource Type 2 hypervisor installed on Linux machines.

Below mentioned is the procedure to setup KVM in a virtual Environment (VMWare Workstation)
_________________________________________________________________________________

Step 1: Install kvm
terminal# apt-get install qemu-kvm libvirt-bin virtinst bridge-utils cpu-checker
_________________________________________________________________________________
Step 2: Verify kvm installation
Ideally the output should be:
terminal# kvm-ok
INFO: /dev/kvm exists
KVM acceleration can be used
If you come across something like this :
INFO : Your CPU does not support KVM extensions
KVM acceleration cannot be used
terminal# ls -l /dev/kvm
ls: cannot access ‘/dev/kvm’: No such file or directory
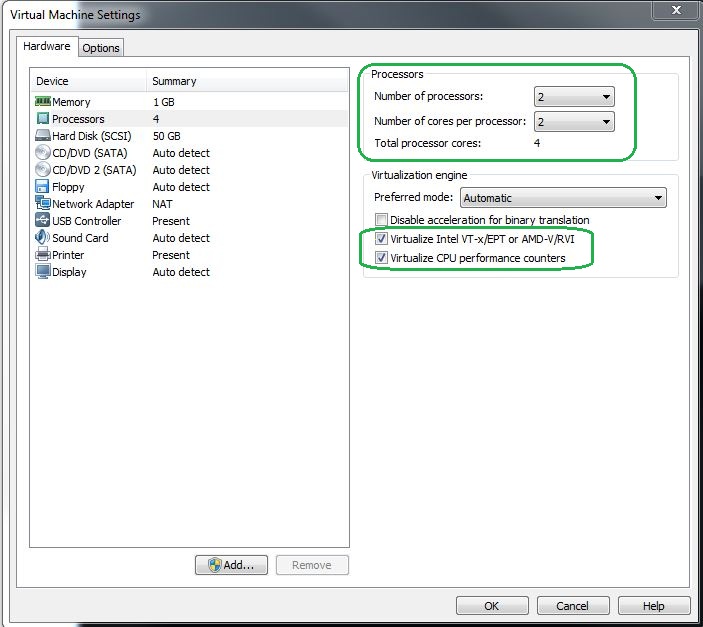
Make the following changes on the workstation :
 Workstation Config

Start the server again and execute the command “terminal# kvm-ok”.

INFO : /dev/kvm exists
KVM acceleration can be used
_________________________________________________________________________________
Step 3 : Check libvirtd status : For QEMU/KVM to connect you need to have libvirt daemon active.
terminal# systemctl status libvirtd
If libvirt daemon is not active, you need to manually start the service using the following command :
terminal# systemctl start libvirtd
_________________________________________________________________________________
Step 4 : Working on getting the GUI access : Need to install virt-manager
terminal# apt-get install virt-manager
To open the GUI :
terminal# virt-manager
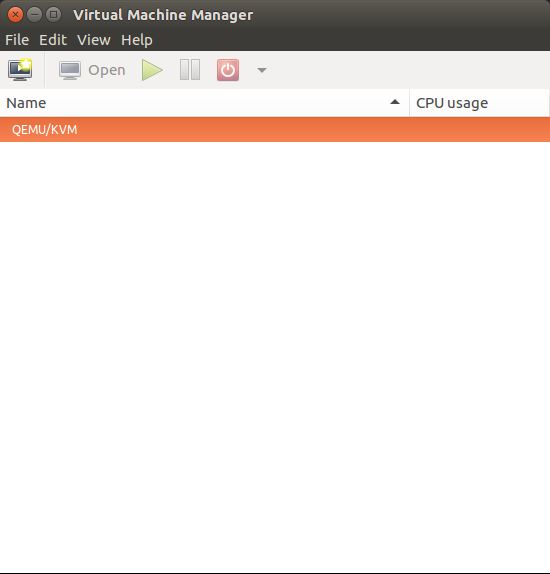
This is what a KVM looks like :

KVM-GUI

That is all. KVM should work absolutely fine.
Note :
  1. To deploy PA you need to allocate RAM > 4 GB.
  2. Also make sure that you configure bridged network on Ubuntu before installing PA. (I will share the details sometime later about the same. This email is just to make you guys aware of KVM)
  3. Installing KVM on Kali Linux is bit tricky as kali cannot find libvirt-bin in its repository (Please stick to Ubuntu Server 14 TLS).

Automated configuration backup of Palo Alto Firewalls without using a Panorama.

Here is a simple way to schedule an automated back up of Palo Alto firewalls without using a Panorama.

Follow the steps below :

  1. Open a Notepad and type the following :

    set dt=%date:~7,2%-%date:~4,2%-%date:~10,4%
    echo %dt%
    curl -kG “https://<Firewall ip>/api/?type=export&category=configuration&key=<api_key>” > D:\PaloAltoBackup\running-config_%dt%.xml

  2. Save the file as a batch file. (.bat)
  3. Create a task using windows interface :
    1.  Start Task Scheduler :a.  Open a command prompt. To open a command prompt, click Start , click All       Programs , click Accessories , and then click Command Prompt.
    b.  At the command prompt, type Taskschd.msc .
    TS-1
    2. Find and click the task folder in the console tree that you want to create the task        in. If you want to create the task in a new task folder, create the folder.

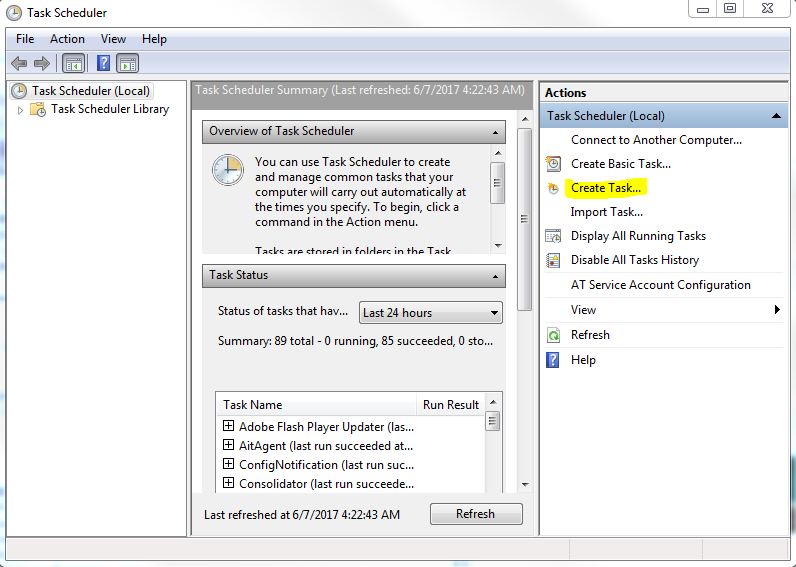
    3.  In the Actions Pane, click Create Task .
    TS-1
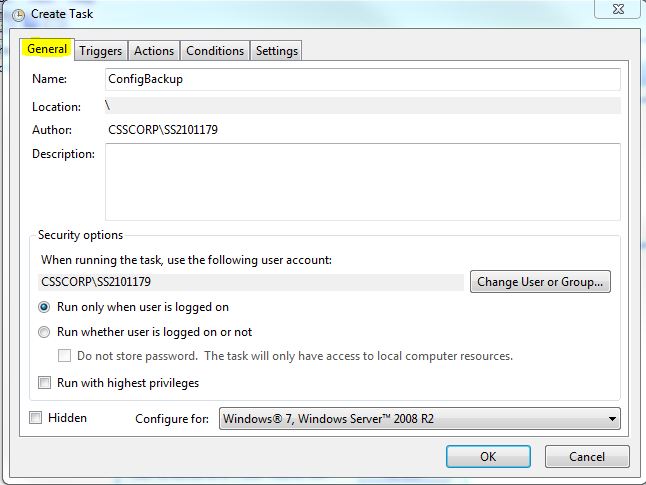
    4.  On the General tab of the Create Task dialog box, enter a name for the ta k. Fill        in or change any of the other properties on the General tab.
    TS-2
    5.  On the Triggers tab of the Create Task dialog box, click the New button to create a trigger for the task, and supply information about the trigger in the New Trigger dialog box.
    TS-3

    TS-4
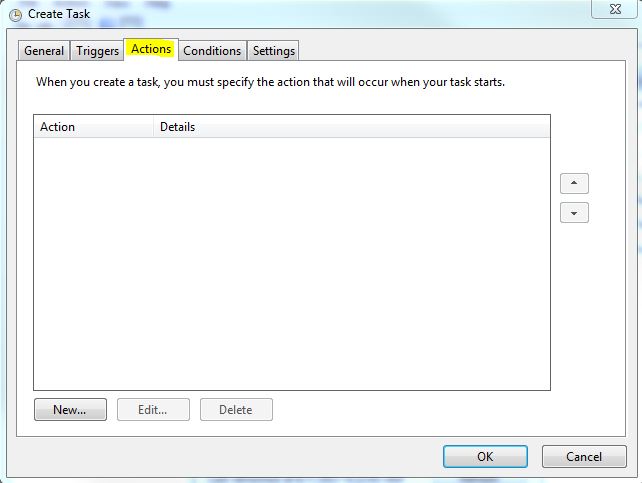
    6.  On the Actions tab of the Create Task dialog box, click the New button to create an action for the task, and supply information about the action in the New Action dialog box. Under settings select the batch file that has been saved before.
    TS-5

    TS-6
    7.   Click the OK button on the Create Task dialog box.

  4. This is all that you need to do to get a scheduled config back up from the firewall (without using a panorama).


Create Certificate chain and sign certificates using Openssl

  1. Generate Root Certificate key.
    openssl genrsa –out RootCA.key 4096
    1-Create RootCA Key

  2. Generate Root certificate.
    openssl req –new –x509 –days 1826 –key RootCA.key –out RootCA.crt
    2-Create RootCA Certificate

  3. Generate Intermediate CA certificate key
    openssl genrsa –out IntermediateCA.key 4096
    3-Create IntermediateCA Key

  4. Generate Intermediate CA CSR.
    openssl req –new –key IntermediateCA.key –out IntermediateCA.csr
    4- Create IntermediateCA CSR

  5. Sign the Intermediate CA by the Root CA.
    openssl x509 –req –days 1000 –in IntermediateCA.csr –CA RootCA.crt –CAkey
    key – CAcreateserial –out IntermediateCA.crt
    6- Sign the IntermediateCA CSR using RootCA

  6. Generate Server certificate key
    openssl genrsa –out Server.key 2048
    8-ServerCert Key

  7. Generate Server certificate CSR.
    openssl req –new –key Server.key –out Server.csr
    9- Create Server Cert CSR
  8. Sign the Server Certificate CSR using the Intermediate CA.
    openssl x509 –req –days 1000 –in Server.csr –CA IntermediateCA.crt –CAkey
    key – set_serial 0101  –out Server.crt –sha1
    10- Sign the Server cert CSR using IntermediateCA

NOTE:
A. This is an add-on for Linux system, especially in cases where you will have to import the certificates in the cert store of Linux systems.

Copy the certificate in the trusted store in Linux:
   Root# cp *.crt  /usr/local/share/ca-certificates/
Root# update-ca-certificates
7- Copy Root and IntermediateCA to the certificate store

B.
To view the key or the certs or the csr generated as per the steps mentioned above use the command “ls”.
Root# ls -l
5- Verify keys certs csr created so far

C. Verify the certificate.
      openssl x509 –in Server.crt –noout –text | grep ‘host.local’

XML API for Palo Alto Firewall’s debug commands.

Recently I came across a scenario where the requirement was to have an XML API for debug commands in Palo Alto firewalls. Unfortunately, the Rest API does not work for debug command, so alternatively, I wrote a script to login i.e ssh into the firewall and issue the debug commands.

I have written a very basic python script (for reference to SSH into the firewall and trigger the command.

#|*********************************************************************
# Project : SSH into the PA firewall and execute commands.
#
# Program name : PADebugCmd.py
#
# Author : Anil Kumar | Palo Alto Networks
#
# Date created : 26th Jan 2017
#
# Purpose : Workaround for a case.
#
#|*********************************************************************

import paramiko
import time

HOSTNAME = '10.10.10.1'  #Firewalls IP
PORT = 22 

def ssh_command(username, password, cmd, hostname=HOSTNAME, port=PORT):
    ssh_client = paramiko.SSHClient()
    ssh_client.set_missing_host_key_policy(paramiko.AutoAddPolicy())
    ssh_client.load_system_host_keys()
    ssh_client.connect(hostname, port, username=username, password=password)
    remote_conn = ssh_client.invoke_shell()
    print "Interactive SSH session established"
    remote_conn.send("set cli pager off\n")
    remote_conn.send(""+cmd+"\n")
    time.sleep(8)
    buff = ''
    while not buff.endswith('>'):
        resp = remote_conn.recv(15000)
        buff += resp
        print(resp)

if __name__ == '__main__':
    username = input("Enter username: ")
    password = input("Enter password: ")  
    cmd = 'debug log-receiver statistics'
    ssh_command(username, password, cmd)

NOTE :

  1. You may tweak the script as per your requirements.
  2. I tried using exec_command(), but the SSH client gets stuck at execute command. I think I did hit a bug with python paramiko. As a work around I used send() and recv() methods of the paramiko channel class. This worked absolutely fine for me.
  3. You may disable echo for password using getpass().


After the Global Protect is disconnected, wireless adapters are unable to restore the DNS configuration.

Here is an issue that has been observed with Palo Alto Network’s Global Protect VPN.
A] Problem Description :
      ==================
— Users use wireless network for successful global protect connection.
— After the GP is disconnected, wireless adapters are unable to restore the DNS configuration.
— I have tested the working with GP Agents 2.3.4, 3.1.0 , 3.1.1, 3.1.2, 3.1.3 and 3.1.4. All of these versions show same behavior.
— References Release Notes:
Issue Identifiers : Release Note
102244 : 3.1.1
100000 : 3.1.2
GPC-3363 : 3.1.3
GPC-3431 : 3.1.4

B] Expected behavior should be : After GP is disconnected, the DNS configurations pushed from the FW should be flushed.

C] This is a known bug, however here is a work around that I came up with.

  1.  Configure a batch script to set the dns of the wireless adapters to dhcp.(Filename: SetDNSScript.bat).
    setdnsscript
  2. Customize the Global Protect msi installer to run the script after GP disconnects.
    You can do this using msiexec – a windows Installer program. Open the command prompt and type the following :
    ” msiexec /i GlobalProtect64.msi PREVPNDISCONNECTCOMMAND=”C:\SetDNSScript.bat” PREVPNDISCONNECTCONTEXT=”admin” PREVPNDISCONNECTFILE=”%userprofile%\SetDNSScript.bat” PREVPNDISCONNECTERRORMSG=”Failed executing post-vpn-connect action” “
  3. You may create a create a batch file to perform deployment(Filename: DeployGP.bat).
  4. This resolved the issue.

    NOTE :
    a) The problem here is we need admin rights or the admin credentials to set the dns of the wireless adapters to dhcp. Practically this wont be possible if the issue is being face by large number of users (users with out admin rights).

    b) DeployGP.bat :
    —————-
    msiexec /i GlobalProtect64.msi PREVPNDISCONNECTCOMMAND=”C:\SetDNSScript.bat” PREVPNDISCONNECTCONTEXT=”admin” PREVPNDISCONNECTFILE=”%userprofile%\SetDNSScript.bat” PREVPNDISCONNECTERRORMSG=”Failed executing post-vpn-connect action”

    SetDNSScript.bat :
    —————
    psexec -u <admin_name> -p <admin_password> netsh interface ip set dns “<Name of Adapter 1>” dhcp
    psexec -u <admin_name> -p <admin_password> netsh interface ip set dns “<Name of Adapter 2>” dhcp
    psexec -u <admin_name> -p <admin_password> netsh interface ip set dns “<Name of Adapter 3>” dhcp
    psexec -u <admin_name> -p <admin_password> netsh interface ip set dns “<Name of Adapter 4>” dhcp
    psexec -u <admin_name> -p <admin_password> netsh interface ip set dns “<Name of Adapter 5>” dhcp
    ipconfig /renew
    pause

Create a new user with sudo permission in Kali Linux 2

  1. Open the terminal and type in the command :
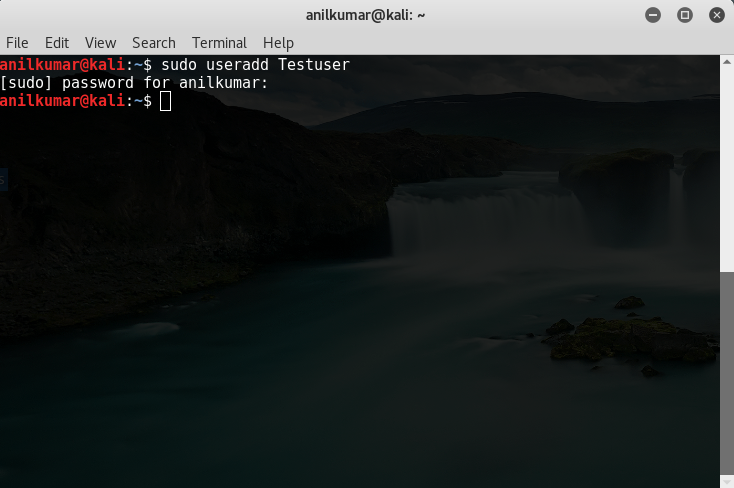
    useradd -m username
    ## -m creates a home directory for the user.
    useradd
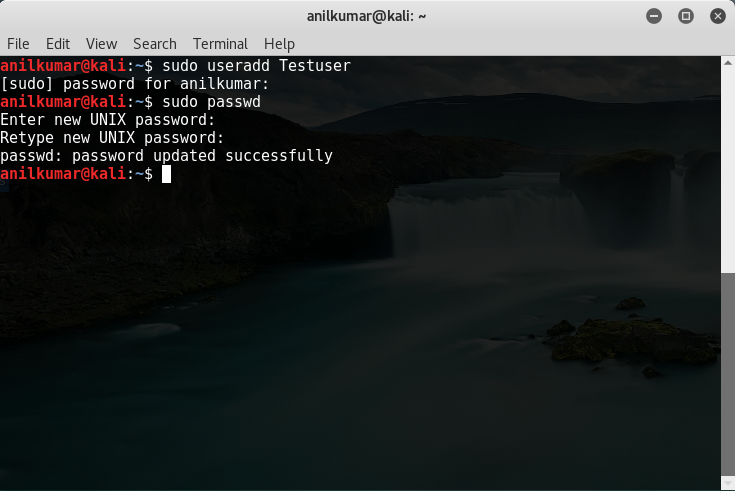
  2. Set the password for the above user :
    passwd username
    ## This will prompt you to enter a password.
    userpassword
  3. At this point we have added a new user. But we need to put this user in “sudoers” group so that this user can use “sudo” commandto perform administrative tasks.

    Type in the command :
    usermod -a -G sudo Testuser
    ## -a means add
    ## -G sudo means to add the user to sudoers group
    usersudoersgroup

  4. Atlast we have to specify the shell for the new user.
    Excecute the following command:
    chsh -s /bin/bash username

    NOTE :
    a. You can delete the user using the following command :
    userdel username

    b. In the above screenshots the commands are preceeded by “sudo” because these have been executed by a non root user.

Using the REST API to add address objects to a Dynamic address group

To add a new entry to a dynamic address object, use the following XML API syntax:

https://<IP>/api/?type=user-id&action=set&key=<KEY>=&file-name=<XMLFILE>

Where IP is the IP address of the firewall under management, KEY is the pre-generated key for the PAN-OS firewall and XMLFILE is the name of the XML file with the needed additions and/or deletions for the dynamic address object.

The XML file must have the following format for adding new IP addresses to an existing object:
<uid-message>
<version>1.0</version>
<type>update</type>
<payload>
<register>
<entry identifier=“OBJECT ID” ip=”IP”/>
</register>
</payload>
</uid-message>

Multiple additions can be made to the same object or to multiple objects in one API call by adding them to the same XML file:
<uid-message>
<version>1.0</version>
<type>update</type>
<payload>
<register>
<entry identifier=“OBJECT ID 1″ ip=”IP1″/>
<entry identifier=“OBJECT ID 1″ ip=”IP2″/>
<entry identifier=“OBJECT ID 2″ ip=”IP3″/>
</register>
</payload>
</uid-message>

Removing an IP address from an object is similar:
<uid-message>
<version>1.0</version>
<type>update</type>
<payload>
<unregister>
<entry identifier=“OBJECT ID 1″ ip=”IP1″/>
<entry identifier=“OBJECT ID 1″ ip=”IP2″/>
<entry identifier=“OBJECT ID 2″ ip=”IP3″/>
</unregister>
</payload>
<uid-message>

Address can be added and removed in same call :
<uid-message>
<version>1.0</version>
<type>update</type>
<payload>
<register>
<entry identifier=“OBJECT ID 3″ ip=”IP4″/>
<entry identifier=“OBJECT ID 3″ ip=”IP5″/>
</register>
<unregister>
<entry identifier=“OBJECT ID 4″ ip=”IP6″/>
</unregister>
</payload>
</uid-message>

Here is something that I replicated in my lab :
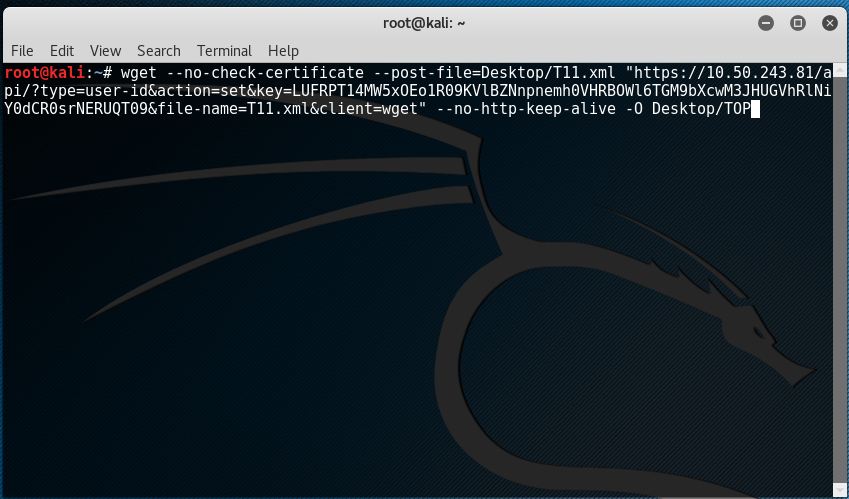
1. Used wget in Kali Linux as a REST client.
2. REST API :

wget –no-check-certificate –post-file=Desktop/T11.xml “https://10.50.243.81/api/?type=user-id&action=set&key=LUFRPT14MW5xOEo1R09KVlBZNnpnemh0VHRBOWl6TGM9bXcwM3JHUGVhRlNiY0dCR0srNERUQT09&file-name=T11.xml&client=wget&#8221;  –no-http-keep-alive -O Desktop/TOP 

wget-api-query-1

NOTE :

T11.xml:
——-
<uid-message>
<version>1.0</version>
<type>update</type>
<payload>
<register>
<entry identifier=“palo” ip=”1.1.1.1″/>
</register>
</payload>
</uid-message>

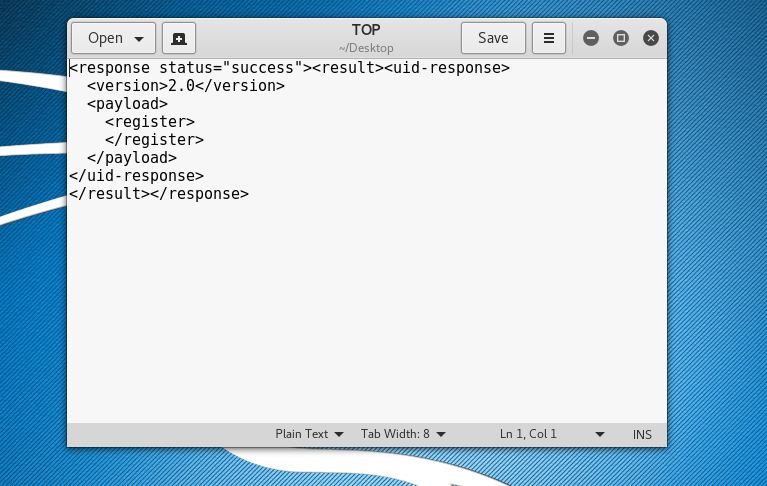
TOP File : ( This reflects the result of the triggered API query)
——–
wget-api-query-output

3.  This is what you should be seeing on the Palo Alto Networks firewall:

CLI :
—-

show object dynamic-address-group all

Dynamic address groups in vsys vsys1:
—————————————————-

—————-defined in vsys ——————–

—————-defined in shared——————-
DynTest
filter: “palo”
members: total 2
1.1.1.1 (R)

O: address object; R: registered ip; D: dynamic group; S: static group
=========================

> show object registered-ip tag palo

registered IP Tags
—————————————- —————–

1.1.1.1 #
“palo”

Total: 1 registered addresses
*: received from user-id agent #: persistent

GUI :
—-
after-commit-and-clicking-more

NOTE :
======
A) I observed buggy behavior with PAN OS 7.1.4 – h2.
Observed Behavior :
—————–
— Could see registered IPs in the CLI.
— But could not see the IPs in Dynamic Address Group.
— Addresses were not visible in the GUI as well.
— Forced commit. (No changes to commit observed so had to force commit)
— Even after commit, could not see the IPs in the dynamic address group.
— Clicked “more”, after which we could see the dynamic addresses in the dynamic address object.
— Checked in CLI, the registered IPs were visible.
— Tested this with different inputs and firewalls, observed the same behavior everytime.
— Unregistered the IP addresses after which we did not see any registered IP but could see those IPs still stuck in Dynamic address group.
— PAN OS 5 had a command to clear the objects using type=op. But the command is no longer available in PAN OS 7.1.

B) This should be filed as a bug shortly. Already shared the results with the concerned PA Team.

Create a Desktop item for an application you installed in Kali Linux 2

Execute the following commands via the Terminal :
——————————————-

apt-get install –no-install-recommends gnome-panel -y
gnome-desktop-item-edit /root/Desktop/ –create-new

NOTE: If you’re not running as root, don’t use the “/root/Desktop” path, use “~/Desktop” instead:
gnome-desktop-item-edit ~/Desktop/ –create-new

Create a template on Panorama in specific vsys using the REST API

You can create a template in a “specific vsys” using API using 2 different APIs. Please use the APIs in the following sequence.

API 1 :
=======

https://<PANORAMA IP>/api/?type=config&action=set&key=<KEY>&xpath=/config/devices/entry[@name=’localhost.localdomain’]/template/
entry[@name=’TEST’]/config/devices/entry[@name=’localhost.localdomain’]/
vsys&element=<entry name=’vsys1’/>

API 2:
======
https://<PANORAMA IP>/api/?type=config&action=set&xpath=/config/devices/entry[@name=’localhost.localdomain’]/template/
entry[@name=’TEST’]/settings&element=<default-vsys>vsys1</default-vsys>&key=<KEY>


NOTE : These APIs have been tested and work absolutely fine 🙂